
Hit enter to search or ESC to close


“Real Estate Photos Editing For Beginners” is a popular keyword search for those who start their journey in real estate photography. In the competitive market, first impressions matter. The primary goal is to showcase a property in its best light, making it attractive and appealing to potential buyers. For beginners looking to dive into the REP realm, this essay will discover efficient shortcuts to mastering the basics.
Light - Practice To Understand Photo Structure
The ability to analyze light in real estate photography is very crucial. It is a prerequisite skill that affects the authenticity of the image. Without lighting analogic, even when the editors master photo editing in Photoshop, they will only create low-quality products, like using AI to edit real estate photos. Images edited by AI are aesthetically pleasing. But still, they annoy viewers because they add many illogical details. That is why comprehending the photography light is mandatory.
Camera Raw - A Smart Technique In Real Estate Photos Editing For Beginners
Camera Raw (CR) in Photoshop is one of the best real estate photo editing apps. Photoshop also supports multiple complicated requests, which makes it confusing and difficult for new editors. With the help of CR, real estate photos editing for beginners becomes easier. CR generally supports solving all the fundamental problems in real estate photos, including color, contrast, highlights, shadow, clarity, vibrance, saturation, Geometry, and so forth. Although CR is a plugin for Photoshop, it can also function as a standalone image editor, providing a quick, harmonious way to process photos.
To open CR, press the keyboard combination Shift + Ctrl + A or select Filter > Camera Raw Filter.

Interface Of Camera Raw In Photoshop
4 Basic Detail Adjustments - How To Edit Real Estate Photos For Beginners
However, CR does not allow access to small details in the image. Therefore, the editor should know how to edit small touches in real estate photos.
The steps to start is to duplicate the layer for security, and create a selection with the details that need more editing.
But in the concise article, we only instruct two ways:
1. Color Cast In Real Estate Photos
Color cast refers to an unwanted tint or bias of color in a photograph, typically caused by uneven lighting conditions. The color of interior objects frequently comes out untrue when the shooting is done. In editing real estate photos, clients find color cast as an eyesore and distracting.
To address these concerns, identify and select the color-cast area on the object, changing the layer blend mode to color. Utilize a soft round brush while holding Alt to temporarily turn the brush into an eyedropper, selecting the closest color to the natural hue of the object. Adjust the layer opacity to around 60% and apply the correction. If certain areas need further attention, use the mask layer to selectively restore or conceal. For a more natural result, consider merging with the original duplicated layer for a seamless finish.

An Example Of Color Cast Result
2. Vertical & Horizontal Alignment In Real Estate Photography
This step ensures that vertical and horizontal lines appear straight, which is a crucial step in real estate photos editing for beginners. Photoshop users can also complete the action with the Geometry in Camera Raw tool. However, they can also use the Free Transform tool in the Develop Module of Photoshop. With this tool, editors can select the entire image and drag the corner of the image opposite to the leaning direction to straighten the photos.
3. Outdoor Sky Replacement In Exterior Real Estate Photography
Sky Replacement in photo editing real estate is crucial as it enhances visual appeal and adds vibrancy, which can change the viewers' impression.
To replace the sky in Photoshop, editors should begin by duplicating the layer and navigating to the channel panel to duplicate it again. After that, open the Levels adjustment with Ctrl + L, adjust the sliders for optimal levels, then use the Lasso tool to select and delete unwanted areas, turning them black.

An Example Of Sky Replacement Technique
Utilize the Dodge brush to brighten the sky. Add a mask to this layer, and position the new sky layer appropriately between the original and duplicated layers. Coming to this step is a good standard in real estate photos editing for beginners. But to better it, the final touch is adding a white gradient layer on top of the sky layer, placing the white part near the house and a translucent part on the top. In this way, editors can enhance realism.
4. Lens, Glare, and Object Removal In Real Estate Photos Editing
The process of removing unwanted objects involves two main actions: deletion and restoration. Once undesirable elements are deleted, editors need to reconstruct concealed details by incorporating similar elements from the image using tools like the Brush and Pencil Tool. This technique varies in complexity, with tasks ranging from straightforward to challenging. For instance, reinstating wooden elements in the editing house photo below is challenging in real estate photos editing for beginners.
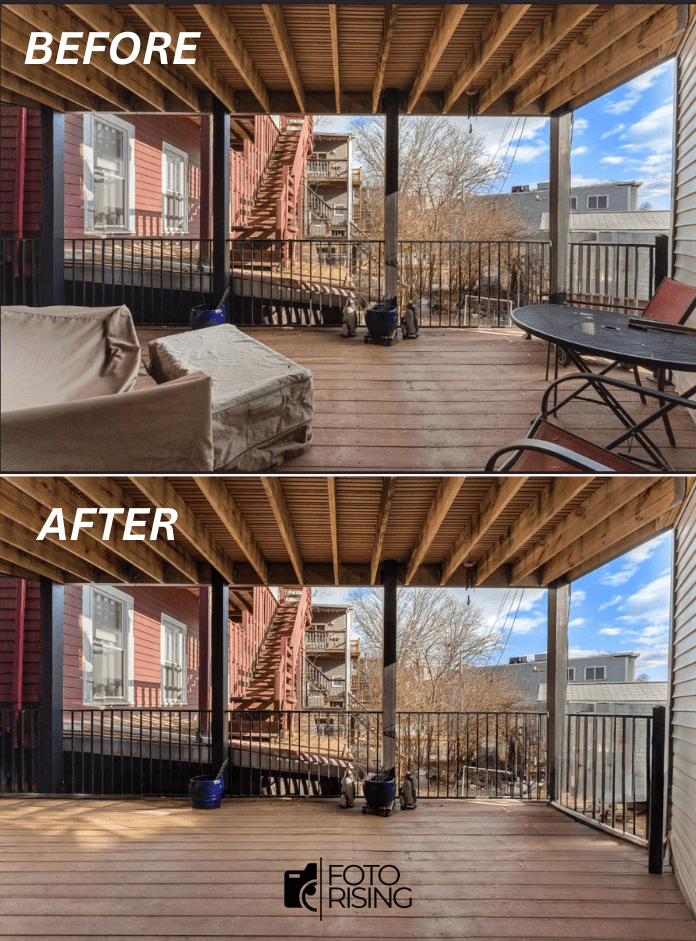
An Example Of A Challenging Object Removal
Instances, where seasoned photographers struggle to remove items, are frequent, emphasizing the importance of relying on skilled editors for such tasks.
In conclusion
Real estate photos editing for beginners only involves mastering basic editing techniques. By investing time in learning essential editing skills, beginners can effectively enhance property images and contribute to the successful marketing and sale of editing house photos.
Related Post
Real Estate Photography: 5 Basic Types Of Real Estate Photos
28 responses to “Real Estate Photography: Shortcut Techniques Of Real Estate Photos Editing For Beginners – Expert Advice”
[…] in post-processing, they also require additional time and effort during shooting and editing HDR real estate photos. Finding a balance between image quality and workflow efficiency is […]
[…] Real Estate Photography: Shortcut Techniques Of Real Estate Photos Editing For Beginners &ndash… […]
Yes, really. I agree with told all above. Let’s discuss this question. Here or in PM.
[…] and burning is a classic editing technique that can be incredibly powerful in portrait photo editing. By selectively lightening (dodging) or […]
Your article helped me a lot, is there any more related content? Thanks!
Your point of view caught my eye and was very interesting. Thanks. I have a question for you.
I don’t think the title of your article matches the content lol. Just kidding, mainly because I had some doubts after reading the article. <a href="https://www.binance.com/ur/register?ref=WTOZ531Y" rel="nofollow ugc">https://www.binance.com/ur/register?ref=WTOZ531Y</a>
Your article helped me a lot, is there any more related content? Thanks!
Your article helped me a lot, is there any more related content? Thanks!
Thank you for your sharing. I am worried that I lack creative ideas. It is your article that makes me full of hope. Thank you. But, I have a question, can you help me?
I don’t think the title of your article matches the content lol. Just kidding, mainly because I had some doubts after reading the article.
Your article helped me a lot, is there any more related content? Thanks!
Thank you for your sharing. I am worried that I lack creative ideas. It is your article that makes me full of hope. Thank you. But, I have a question, can you help me?
Your article helped me a lot, is there any more related content? Thanks!
I don’t think the title of your article matches the content lol. Just kidding, mainly because I had some doubts after reading the article.
Can you be more specific about the content of your article? After reading it, I still have some doubts. Hope you can help me.
Thanks for sharing. I read many of your blog posts, cool, your blog is very good.
Thanks for sharing. I read many of your blog posts, cool, your blog is very good.
Your article helped me a lot, is there any more related content? Thanks!
Your point of view caught my eye and was very interesting. Thanks. I have a question for you.
Thank you for your sharing. I am worried that I lack creative ideas. It is your article that makes me full of hope. Thank you. But, I have a question, can you help me?
Your point of view caught my eye and was very interesting. Thanks. I have a question for you.
I don’t think the title of your article matches the content lol. Just kidding, mainly because I had some doubts after reading the article.
Thanks for sharing. I read many of your blog posts, cool, your blog is very good.
Thank you for your sharing. I am worried that I lack creative ideas. It is your article that makes me full of hope. Thank you. But, I have a question, can you help me?
Thanks for sharing. I read many of your blog posts, cool, your blog is very good.
Thank you for your sharing. I am worried that I lack creative ideas. It is your article that makes me full of hope. Thank you. But, I have a question, can you help me?
Thank you for your sharing. I am worried that I lack creative ideas. It is your article that makes me full of hope. Thank you. But, I have a question, can you help me?