
Hit enter to search or ESC to close


Whether you are a professional real estate photographer or a homeowner looking to sell your property, adequately preparing for shooting real estate photos can produce optimum efficiency in your work.
There are many preparations needed, but this article will discuss the most helpful factors that can become a handbook of real estate photography tips for beginners.
1. Preparing For Shooting Real Estate Photos With A Shooting List
The first imperative preparation before taking real estate photography is discussing carefully the shooting list with the realtors or homeowners beforehand. Walking through the house, doing camera testing, and listing out the angles to shoot by yourself is, of course, paramount. Nevertheless, the sellers are likely to have different requests which helps them stand out from the competitors in terms of marketing.
In attempting to strategically plan photography schedules, making sure to reach a consensus on the final shooting list with the sellers will reduce the working time, and leave a professional impression.
2. Creating A Real Estate Photography Checklist With The Realtors
Before diving into the actual shot, giving clear house-preparing instructions to the sellers or homeowners is a hacking choice. The instruction usually includes two steps: decluttering and staging.
2.1. Cleaning Up And Removing Objects.
Cluttered and messy spaces can be off-putting to potential buyers, so it is important to create a clean and inviting atmosphere. There are three key real estate photography tips for sellers to declutter professionally.
- Remove unnecessary details: rubbish, dust, etc. may hinder the appeal of the property.
- Remove personal belongings: toothpaste, shoes, toiletries, personal collection, etc. These items deliver a secondhand feeling, typically devaluing the properties.
- Remove moving objects from the shooting spot: pets, people, or electronic devices (fans, heaters, etc.). Real estate photography camera settings are adjusted to capture the unmoving furniture. The existence of things in motion will blur the shot, resulting in inflaming time and costs. In addition, moving objects can be potentially dangerous. For example, in small spaces such as bedrooms or toilets, small animals will get caught in the power lines of the camera, causing electric shock or fire.
Here are some detailed suggestions:
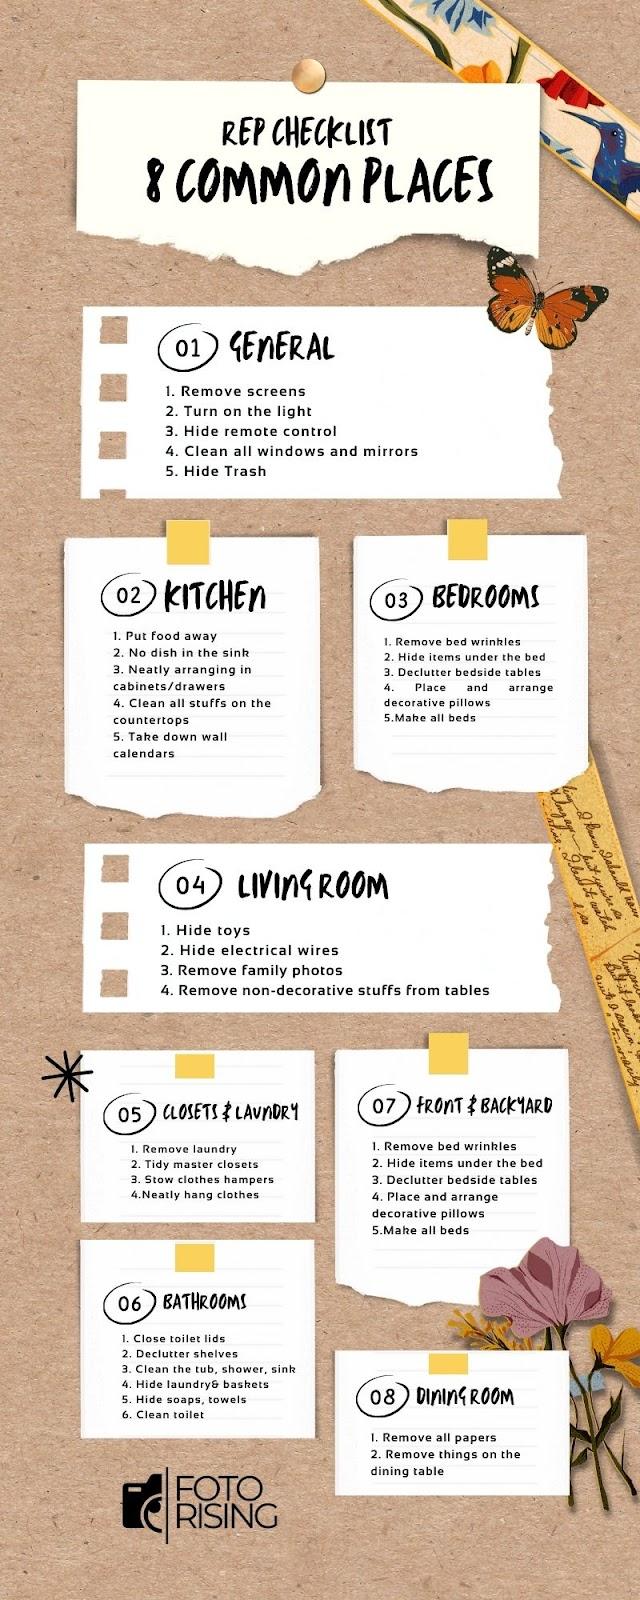
A Real Estate Photography Basic Checklist With The Realtors
2.2. Staging Artistic Furniture.
Another essential step in the realtor's checklist is decoration. A good present of the furniture is very important in real estate photography. The way a property is presented influences potential buyers' perceptions. Arranging furniture that maximizes the space and flow of each room, creating a welcoming ambiance is one privilege preparation for shooting real estate photos. Small touches such as fresh flowers, neatly arranged furnishings, and so forth can strategically generate a significant difference in the overall appearance of the property.
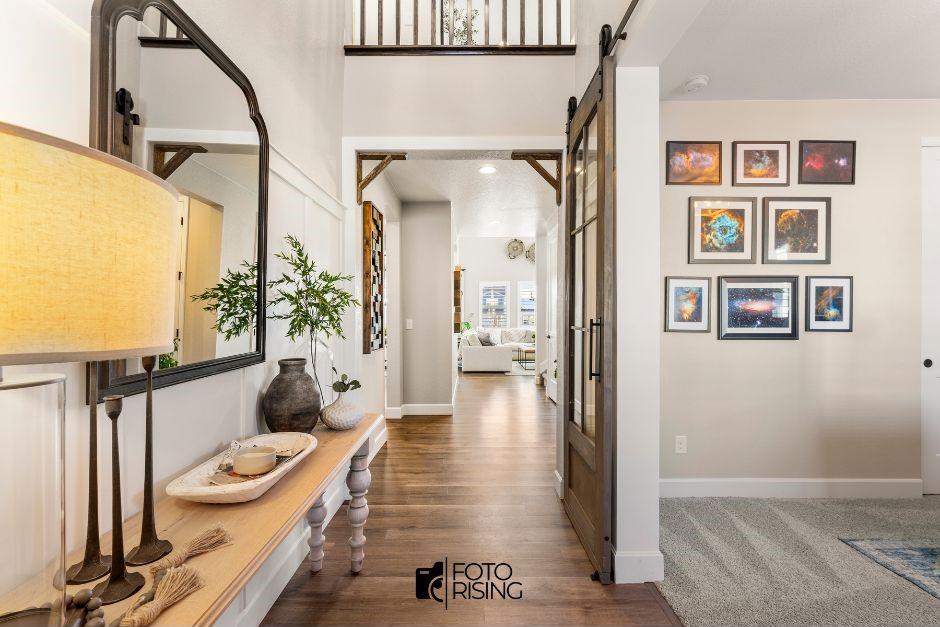
An Example For House Decoration
3. Preparing For Shooting Real Estate Photos With Proper Tools And Equipment
When it comes to REP, understanding the insights of supporting tools such as Tripod, Flash, Lens, and so on is essential. The comprehension here lies in mastering the techniques of using the camera, as well as the coordination of accompanying shooting devices. These tools serve as indispensable aids in overcoming challenges and elevating the quality of property images. Professional photographers who have a hundred tools may find it impossible to bring all of them to the shooting spots. That is the reason why picking the correct ones is a must.
Moreover, be prepared with essential equipment such as extra batteries, memory cards, a tripod, and a remote shutter release. These items will help ensure every shot is effective without any hiccups or interruptions.

An Example For Real Estate Photography Tools
4. Preparing For Shooting Real Estate Photos In Correct Time
Schedule your shooting time is a crucial aspect of real estate photography. In particular, light plays a crucial role in photographing. Choosing the golden hours, early morning or late afternoon, will ensure soft and flattering natural light, reducing harsh shadows and creating a balanced distribution of illumination, which helps capture the property in its best light.
However, photography jobs have a tight schedule, so the attempt to align photography jobs with the best shooting time does not always work out. Still, if nature does not support it, try real estate photography editing. This method helps buy some time.
In Conclusion
Preparing for shooting real estate photos involves several steps that contribute to the overall quality and appeal of a photography portfolio. Following these guidelines, photographers can create visually stunning photographs that effectively showcase properties and attract potential buyers.
Related Posts
Real Estate Photography: 5 Basic Types Of Real Estate Photos
16 responses to “Real Estate Photography: The Best Tips For Preparing For Shooting Real Estate Photos”
[…] beauty and attract buyers.Read more:5 Blow-Mind Tips For Stunning Interior Real Estate PhotosReal Estate Photography: The Best Tips For Preparing For Shooting Real Estate PhotosReal Estate Photography: A Definition Of Real Estate […]
[…] the real estate industry, high-quality real estate photos play a crucial role in attracting the attention of buyers and creating a positive first impression. […]
Your point of view caught my eye and was very interesting. Thanks. I have a question for you.
Thank you for your sharing. I am worried that I lack creative ideas. It is your article that makes me full of hope. Thank you. But, I have a question, can you help me?
Your article helped me a lot, is there any more related content? Thanks!
Your article helped me a lot, is there any more related content? Thanks!
Your point of view caught my eye and was very interesting. Thanks. I have a question for you.
Thank you for your sharing. I am worried that I lack creative ideas. It is your article that makes me full of hope. Thank you. But, I have a question, can you help me?
Can you be more specific about the content of your article? After reading it, I still have some doubts. Hope you can help me.
I don’t think the title of your article matches the content lol. Just kidding, mainly because I had some doubts after reading the article.
Thanks for sharing. I read many of your blog posts, cool, your blog is very good.
Thank you for your sharing. I am worried that I lack creative ideas. It is your article that makes me full of hope. Thank you. But, I have a question, can you help me?
Feel free to visit my blog post; <a href="https://cryptolake.online/crypto7" rel="nofollow ugc">https://cryptolake.online/crypto7</a>
Thank you for your sharing. I am worried that I lack creative ideas. It is your article that makes me full of hope. Thank you. But, I have a question, can you help me?
Thank you for your sharing. I am worried that I lack creative ideas. It is your article that makes me full of hope. Thank you. But, I have a question, can you help me?
Thank you for your sharing. I am worried that I lack creative ideas. It is your article that makes me full of hope. Thank you. But, I have a question, can you help me?