
Hit enter to search or ESC to close


Is Editing Real Estate Photos Necessary?
In the current visually-focused real estate market, editing real estate photos is vital with every photographer and businessman. Enhanced images draw in more buyers and present properties at their finest, aiding your agent clients in selling more homes and expanding your photography business.
This guide will teach you how to edit real estate photos like a professional using 16 straightforward yet effective techniques. These methods will help you master real estate photo editing and elevate your photography skills.
16 Steps for Editing Real Estate Photos Like a Pro
Step 1: Brightness & Color Correction
The foundation of any real estate photo enhancement starts with brightness, exposure, and color correction. The common editing real estate photo software like Lightroom and Photoshop are essential for these adjustments. Mastering these basics can transform your photos from dull to stunning.
Step 2: Object Removal & Decluttering
Remove clutter to make your real estate images look more professional.

Imagine a serene garden ruined by a car, or wires and clutter disrupting interior shots. Photoshop can fix these common issues.
Use the ‘Clone Stamp’ or ‘Healing Brush’ tools to eliminate unwanted objects or distractions from your photos, such as cords and wires, pet toys, or stray items.
Step 3: HDR Blending & Bracketing
Merge multiple exposures using HDR blending to create well-exposed images with more detail.
This technique enables you to combine multiple bracketed exposure shots (typically 3 or more) using photo editing software to produce a single image with balanced exposure across highlights, mid-tones, and shadows.
This enhances the details in your images and makes them stand out.

Step 4: Horizontal & Vertical Lines Correction
Correcting distortions caused by lens curvature or camera tilt ensures straight lines, crucial for real estate photos.
Unwanted distortions often result from lens curvature, space shape, and slight camera tilts. Fortunately, vertical lines correction in post-processing can rescue your photos. For real estate photographers, this technique is crucial, straightening curves and aligning every line perfectly to the frame's edge
Step 5: Noise Reduction
Reduce digital noise for clearer images, especially those taken in low light.
Your vibrant, detailed photos can be marred by unwanted fuzzy dots, diminishing their appeal. Noise or grain often results from low light, digital errors, long exposures, or camera sensor limits.
Fortunately, you can easily fix grainy photos with the right adjustments, restoring the clarity and striking definition essential for real estate photography.

Step 6: Image Sharpening
Enhance edge definition and add detail to your photos by sharpening them.
Sharpness is vital in real estate photography. Mastering Photoshop's image sharpening can enhance your property shots, adding depth, detail, and contrast to architectural elements.
Edge definition greatly impacts visual appeal. Almost every photo, whether digital or scanned, benefits from sharpening.
Using Photoshop's tools to reveal hidden details elevates your photography, captivating potential buyers.
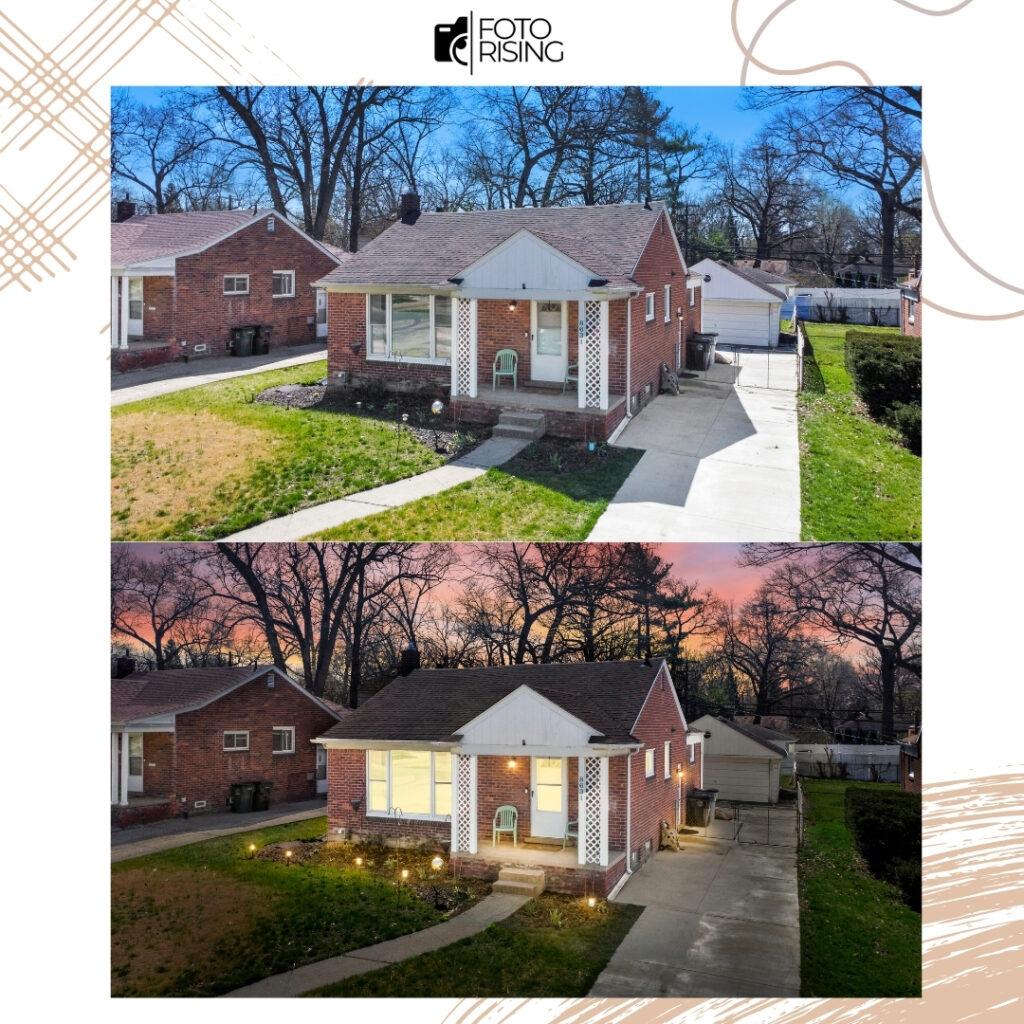
Step 7: Sky Replacement
Replace overcast skies with vibrant ones to make your real estate photos more appealing.
Clear skies make real estate photos captivating, while overcast conditions can dull their appeal. Modern editing software, like Photoshop, allows for easy sky replacement, enhancing property charm and brightness. Mastering this technique frees photographers from weather constraints, transforming dull skies into vibrant, summery backdrops.
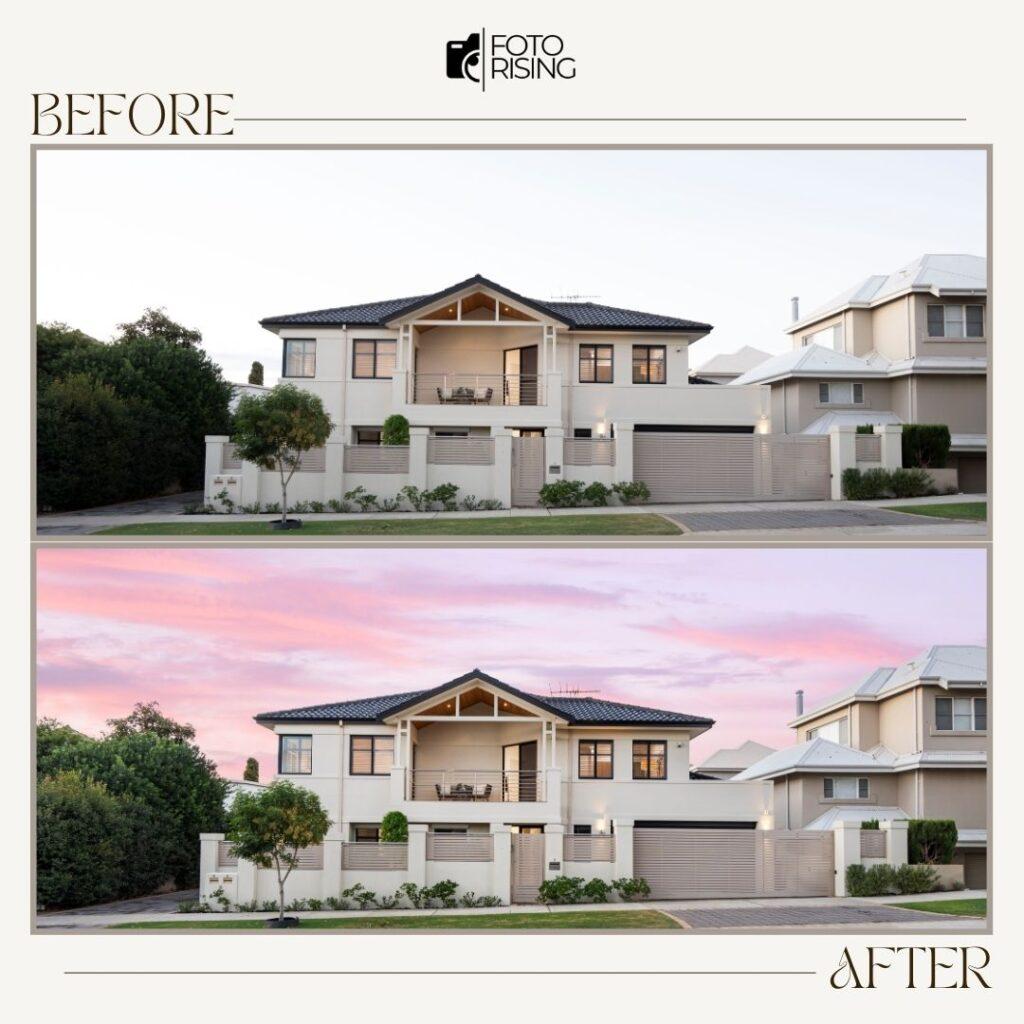
Step 8: Day-to-Dusk Conversions
Turn day shots into dusk by darkening the sky and adjusting lighting to create an inviting atmosphere.
Mastery of sky replacement enhances listing appeal in real estate photography, distinguishing you in the industry. Ensure new sky lighting matches.
Step 9: Color Cast Removal
Eliminate unwanted color casts caused by ambient lighting for more natural-looking photos.
Step 10: Lawn/Landscape Enhancements
Enhance the look of lawns and landscaping to improve curb appeal.
Fortunately, you can quickly improve the appearance of brown, patchy lawns by adjusting saturation and luminance sliders to create a fresh, green look. This simple technique greatly enhances curb appeal. Utilize Photoshop to tweak lawn color and enhance landscaping in your photos.
Step 11: Window Masking
Control bright windows that can distract from interior details by masking them in Photoshop.
Bright windows can distract from interior details, causing glare and blurriness in photos. Window masking in real estate editing addresses these issues, allowing alteration of scenery and enhancing images.
Step 12: Eliminating Ghosting
Remove ghosting caused by HDR techniques or moving objects for cleaner images.
Ghosting is utilized in some artistic photography to augment the mood or ambiance of an image. Nonetheless, in real estate photography, ghosting detracts from the professionalism and completion of the photoshoot.
Fortunately, eliminating ghosting in Photoshop is straightforward for those familiar with the software.
Step 13: Removing Shadows
Balance lighting in images by reducing harsh shadows and glare.
In some instances, photos may exhibit deep shadows and glare from light sources, which can detract from their quality. While shadows can enhance artistic appeal, they often create distractions, especially in real estate photography.
Real estate photographers can rectify these issues by uncovering hidden details in shadows, thus balancing lighting and reducing their harshness. This adjustment minimizes glare, resulting in a more natural and attractive appearance.
Step 14: Leveraging Virtual Staging
Use virtual staging to insert digital furniture into empty homes, making them more appealing to buyers.
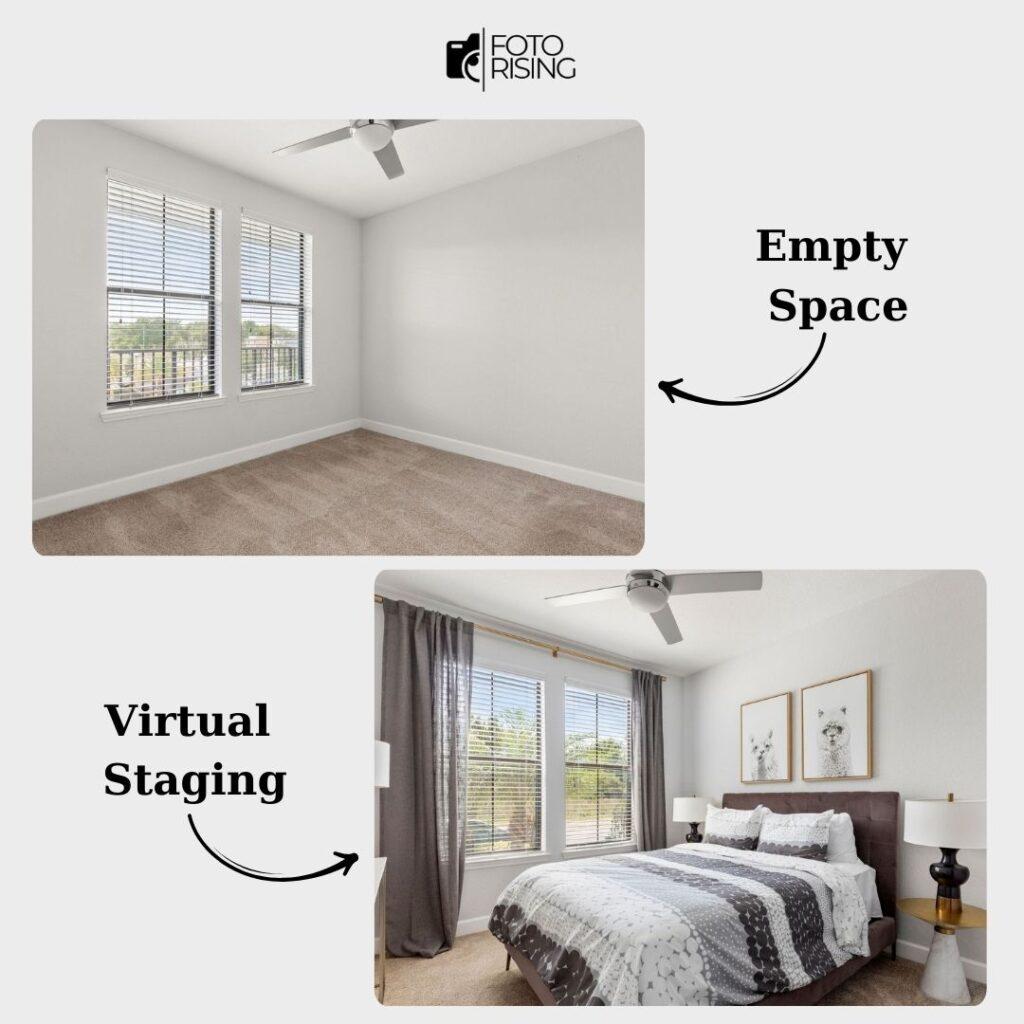
This entails adding digital furniture to your images to create a modern, comfortable, and inviting atmosphere that will resonate with your intended audience.
Step 15: Adding Text/Watermarking Your Images
Add text or watermarks for branding and copyright protection.
Watermarks safeguard photographers' work, preventing unauthorized use by clearly marking image ownership.
Adding business names or text to real estate photos can boost brand recognition. Photoshop facilitates these essential edits, ensuring images are protected and branded effectively.
Step 16: Performing Batch Edits
Save time by applying common adjustments to multiple images simultaneously.
Finally, mastering batch editing saves time by applying common adjustments to multiple images simultaneously, ensuring portfolio consistency.
The process is simple: make edits to one photo and sync these changes across the rest of the images for efficient retouching and adjustments.
So How Do You Think Editing Real Estate Photos Affects Business?
In 2021, 99% of potential homebuyers searched for properties online, with homes featuring exceptional listing photos commanding a 47% higher asking price per square foot. This underscores the importance of high-quality real estate images in attracting online buyers and facilitating home sales.
Moreover, regardless of photographic skill, superior real estate photography requires post-processing. Elements like adverse weather, artificial lighting, and clutter can distort and diminish photo quality.
As a real estate photographer, your role extends beyond capturing images; you must also deliver meticulously edited photos that intrigue viewers and encourage further exploration of the property. Mastering color-correction techniques is crucial for enhancing photos, ensuring accurate representation and enticing potential buyers.
Conclusion
High-quality real estate photos are essential in capturing buyers’ attention and selling homes. By mastering these 16 steps, you can enhance your real estate photography and grow your business.
However, even the most skilled photographers may benefit from professional photo editing services to truly make their listings shine. That's where BeatColor comes in. Renowned for their reliability, quality, and affordability, BeatColor is the ideal partner for enhancing your real estate photos. Their expertise can transform ordinary images into stunning visual assets that effectively capture buyers' attention and drive engagement.
Related posts:
Best And Free Way To Speed Up Your Real Estate Photography Workflow
AI Will Replace Real Estate Photography Jobs – Is It True?
HDR Real Estate Photography – Top 10 Secrets You Should Know!
81 responses to “How Editing Real Estate Photos Work Like an Expert?”
2xugy8
[…] => Read more: Is Editing Real Estate Photos Necessary? […]
I was examining some of your content on this site and I believe this web
site is really informative! Retain posting.<a href="http://air417.net/__media__/js/netsoltrademark.php?d=www.blogexpander.com" rel="nofollow ugc">Money from blog</a>
[…] Posts:How Editing Real Estate Photos Work Like An Expert?HDR Real Estate Photography- How Many Exposures Are Preferred? 5 Mind-Blowing Tips For Stunning […]
Can you be more specific about the content of your article? After reading it, I still have some doubts. Hope you can help me.
<a href="https://fernseherfuchs.com/detik288-login-23/" rel="nofollow ugc">detik288</a>
I am curious to find out what blog platform you’re utilizing?
I’m having some minor security problems with my latest blog and I’d like to find something more risk-free.
Do you have any recommendations?
<a href="https://shikshaniketan.org/apk-live-bar-bar-tanpa-lock-29/" rel="nofollow ugc">apk live bar bar</a>
Hello! This is my 1st comment here so I just wanted to give a quick shout out and
say I really enjoy reading through your posts.
Can you suggest any other blogs/websites/forums that cover
the same subjects? Thanks a ton!
<a href="https://fortvalleychiropractic.com/" rel="nofollow ugc">laku toto</a> <a href="https://socutesoculture.com/" rel="nofollow ugc">laku toto</a> <a href="https://bsksoft.com/" rel="nofollow ugc">laku toto</a> <a href="https://lisasmystylist.com/" rel="nofollow ugc">laku toto</a> <a href="https://dr-kayser.com/" rel="nofollow ugc">laku toto</a>
Hey very nice blog!! Guy .. Beautiful .. Superb ..
I’ll bookmark your web site and take the feeds also? I am satisfied to
find a lot of useful information right here in the put up, we’d like develop
extra strategies in this regard, thanks for sharing.
. . . . .
kepritogel <a href="https://showcaseclean.com/" rel="nofollow ugc">kepritogel</a> kepritogel
Hey very nice blog!
demo slot <a href="https://showcaseclean.com/" rel="nofollow ugc">demo slot</a> demo slot
When some one searches for his vital thing,
thus he/she wants to be available that in detail, so that thing is maintained over here.
Your point of view caught my eye and was very interesting. Thanks. I have a question for you.
olxslot olxslot
I pay a visit day-to-day a few web sites and information sites to read articles, except this
webpage gives quality based content.
indomaster88 <a href="https://corporate-fit.com/indomaster88/" rel="nofollow ugc">indomaster88</a> indomaster88
Thank you, I’ve just been searching for information approximately this subject for a while and yours is
the greatest I have found out till now. However, what in regards
to the conclusion? Are you certain concerning the supply?
Patek Philippe is a legendary Swiss watchmaker celebrated for its luxury timepieces. Founded in 1839, the brand has maintained a legacy of luxury. Collectors and enthusiasts cherish Patek Philippe for its pioneering designs and exclusivity.
<a href="https://patek.superpodium.com" rel="nofollow ugc">https://patek.superpodium.com</a>
kaskustoto <a href="https://kriegerlaw.net/" rel="nofollow ugc">kaskustoto</a> kaskustoto
First of all I would like to say terrific blog!
I had a quick question which I’d like to ask if you do not mind.
I was interested to find out how you center yourself and clear your thoughts before writing.
I have had difficulty clearing my thoughts in getting my thoughts out there.
I truly do enjoy writing however it just seems like the first 10 to 15 minutes are wasted simply just trying to figure
out how to begin. Any ideas or tips? Cheers!
Wow, marvelous blog layout! How long have you been blogging for?
you make blogging look easy. The overall look of your website is great, let
alone the content!
When someone writes an piece of writing he/she retains
the image of a user in his/her mind that how a user can understand it.
So that’s why this piece of writing is great. Thanks!
Hey I know this is off topic but I was wondering if you knew
of any widgets I could add to my blog that automatically tweet my newest twitter updates.
I’ve been looking for a plug-in like this for quite some time
and was hoping maybe you would have some experience with something like this.
Please let me know if you run into anything. I truly enjoy reading your blog and I look forward to your new updates.
Hmm it looks like your website ate my first comment (it was super long) so
I guess I’ll just sum it up what I submitted and say, I’m
thoroughly enjoying your blog. I too am an aspiring blog writer but I’m still new to the whole thing.
Do you have any tips for newbie blog writers? I’d genuinely appreciate it.
magnificent put up, very informative. I ponder why the opposite specialists of this sector do not notice this.
You must proceed your writing. I am sure, you have a great readers’ base already!
На этом сайте представлены действующие промокоды для Ламода. Примените их, чтобы сэкономить выгодную покупку на лучшие товары. Коды на скидку актуализируются каждую неделю, чтобы вы всегда могли воспользоваться эксклюзивными предложениями.
<a href="https://lamoda.fashionpromo.ru" rel="nofollow ugc">https://lamoda.fashionpromo.ru</a>
I’m impressed, I have to admit. Seldom do I encounter a blog that’s equally educative and entertaining, and let me tell you, you’ve hit the nail on the head.
The problem is something which not enough men and women are speaking intelligently
about. I’m very happy I stumbled across this during my search for something regarding this.
Hi there Dear, are you genuinely visiting this web page daily, if so afterward you will definitely get good know-how.
I’m not sure why but this weblog is loading extremely slow for me.
Is anyone else having this issue or is it a issue on my
end? I’ll check back later on and see if the problem still exists.
Can you be more specific about the content of your article? After reading it, I still have some doubts. Hope you can help me.
Attractive section of content. I just stumbled
upon your site and in accession capital to assert that I get in fact enjoyed account your blog posts.
Any way I’ll be subscribing to your feeds and even I achievement you access consistently rapidly.
I believe this is among the most important info for me.
And i’m glad reading your article. However should remark on few basic things, The website taste is great, the articles is in point of fact nice : D.
Excellent process, cheers
Can I simply just say what a comfort to uncover a person that actually understands what they are discussing on the web.
You certainly understand how to bring an issue to light and
make it important. More people have to read this and understand this side of your story.
I was surprised you’re not more popular because you surely
possess the gift.
Excellent items from you, man. I’ve have in mind your stuff previous to and you’re simply too
wonderful. I actually like what you have obtained here, certainly like what you’re saying and the best way by which you assert it.
You make it entertaining and you still care for to keep it smart.
I cant wait to read far more from you. That is really a
great website.
Премиальный интернет-магазин Bottega Veneta предлагает широкий ассортимент оригинальной продукции от итальянской марки. Здесь вы сможете подобрать и купить аксессуары из новых коллекций с доставкой по Москве и России.
<a href="https://bottega-official.ru" rel="nofollow ugc">https://bottega-official.ru</a>
When I initially commented I clicked the “Notify me when new comments are added”
checkbox and now each time a comment is added I get three emails with the same comment.
Is there any way you can remove me from that service? Appreciate it!
Thank you for your sharing. I am worried that I lack creative ideas. It is your article that makes me full of hope. Thank you. But, I have a question, can you help me?
Thanks for sharing. I read many of your blog posts, cool, your blog is very good.
Thanks for sharing. I read many of your blog posts, cool, your blog is very good.
What’s up to every body, it’s my first visit of this blog; this webpage
carries awesome and really good material in favor of
visitors.
Spot on with this write-up, I truly feel this amazing site needs much more
attention. I’ll probably be back again to read through more,
thanks for the info!
Thanks for sharing. I read many of your blog posts, cool, your blog is very good.
awesome
I don’t think the title of your article matches the content lol. Just kidding, mainly because I had some doubts after reading the article.
This cutting-edge CCTV software delivers a robust video surveillance solution, featuring advanced detection capabilities for people, cats, birds, and dogs. As a comprehensive surveillance camera software, it acts as an IP camera recorder and supports time-lapse recording. <a href="https://www.opinionbulletin.com/cloud-video-surveillance-when-its-truly-cool-and-when-its-just-a-nice-to-have/" rel="nofollow ugc">Cloud Video Surveillance</a> Enjoy secure remote access to your IP camera feeds through a trusted cloud video surveillance platform. This video monitoring software enhances your security system and is an ideal option for your CCTV monitoring needs.
Write more, thats all I have to say. Literally, it seems as though you relied on the video to
make your point. You clearly know what youre talking about,
why throw away your intelligence on just posting videos to your blog when you could
be giving us something informative to read?
I know this website presents quality depending posts and other material, is
there any other web page which gives these information in quality?
Hey There. I found your blog using msn. This is an extremely well written article.
I’ll be sure to bookmark it and return to read more of
your useful info. Thanks for the post. I’ll definitely return.
Undeniably believe that that you stated. Your favourite reason appeared to be
on the web the easiest factor to keep in mind of.
I say to you, I definitely get annoyed even as other people think about worries that they just don’t recognize about.
You controlled to hit the nail upon the highest and defined out the whole thing with
no need side-effects , other folks could take a signal.
Will likely be back to get more. Thank you
bookmarked!!, I love your site!
Thank you for your sharing. I am worried that I lack creative ideas. It is your article that makes me full of hope. Thank you. But, I have a question, can you help me?
Pretty! This was an incredibly wonderful article. Thanks for supplying these details.
Sweet blog! I found it while searching on Yahoo News.
Do you have any tips on how to get listed in Yahoo News?
I’ve been trying for a while but I never seem to
get there! Thanks
I know this if off topic but I’m looking into starting my own weblog and
was curious what all is required to get setup? I’m assuming having a
blog like yours would cost a pretty penny? I’m not very internet smart so I’m not 100% sure.
Any tips or advice would be greatly appreciated.
Appreciate it
Hey I know this is off topic but I was wondering if
you knew of any widgets I could add to my blog that automatically tweet my newest twitter updates.
I’ve been looking for a plug-in like this for quite some time and was hoping maybe you
would have some experience with something like this.
Please let me know if you run into anything.
I truly enjoy reading your blog and I look forward to your new updates.
I am curious to find out what blog system you’re working with?
I’m having some small security issues with my latest blog and
I’d like to find something more safeguarded. Do you have any solutions?
If some one wishes expert view concerning blogging afterward i recommend him/her to
go to see this web site, Keep up the pleasant job.
Your point of view caught my eye and was very interesting. Thanks. I have a question for you.
I don’t think the title of your article matches the content lol. Just kidding, mainly because I had some doubts after reading the article.
Magnificent website. Plenty of helpful info here.
I am sending it to several pals ans additionally sharing in delicious.
And certainly, thanks to your effort!
Hello! I just wish to offer you a big thumbs up for your excellent info you have got right
here on this post. I am returning to your website
for more soon.
Your point of view caught my eye and was very interesting. Thanks. I have a question for you.
I am extremely impressed with your writing skills and also with the layout on your
weblog. Is this a paid theme or did you modify
it yourself? Anyway keep up the excellent quality writing, it’s rare
to see a great blog like this one nowadays.
What’s up mates, its enormous article regarding tutoringand completely defined, keep it
up all the time.
This site was… how do I say it? Relevant!!
Finally I’ve found something which helped me. Thanks!
Your point of view caught my eye and was very interesting. Thanks. I have a question for you.
It’s actually a cool and helpful piece of information. I’m satisfied that you just shared this helpful info with us.
Please keep us up to date like this. Thank you for sharing.
very genius and talented, Im waiting for other interesting things <a href="https://sspedia.com/" rel="nofollow ugc">slot777</a>
Hey there! This is my first visit to your blog!
We are a group of volunteers and starting a new initiative in a community in the same niche.
Your blog provided us valuable information to work on. You have done a wonderful job!
Thank you for the auspicious writeup. It actually was a leisure account it.
Look complicated to more added agreeable from you!
By the way, how can we communicate?
This design is spectacular! You definitely know how
to keep a reader amused. Between your wit and your videos,
I was almost moved to start my own blog (well, almost…HaHa!) Wonderful job.
I really loved what you had to say, and more than that,
how you presented it. Too cool!
Do you mind if I quote a few of your articles as long as I
provide credit and sources back to your webpage? My website is in the exact same niche as yours and
my users would genuinely benefit from some of the information you
present here. Please let me know if this alright with you.
Thanks!
Howdy! Do you know if they make any plugins to safeguard against hackers?
I’m kinda paranoid about losing everything I’ve worked hard on. Any recommendations?
Keep on working, great job!
I’m not that much of a internet reader to be honest but your sites
really nice, keep it up! I’ll go ahead and bookmark your site to come back later.
All the best
This is a topic that’s near to my heart… Thank you! Where are your contact details
though?
Your point of view caught my eye and was very interesting. Thanks. I have a question for you.
If some one wishes to be updated with newest technologies after that he must be visit this
site and be up to date every day.
Your article helped me a lot, is there any more related content? Thanks!
What’s Happening i’m new to this, I stumbled upon this I’ve discovered It absolutely helpful and it has aided me out loads.
I’m hoping to give a contribution & assist different users
like its aided me. Good job.
Thanks for sharing. I read many of your blog posts, cool, your blog is very good.
Hello there, I found your blog by way of Google even as searching for a related matter,
your web site came up, it seems to be good. I have
bookmarked it in my google bookmarks.
Hello there, simply become aware of your weblog through Google, and located that it is truly informative.
I am gonna be careful for brussels. I will appreciate for those who continue this in future.
Many people will likely be benefited from your writing.
Cheers!
Thank you for your sharing. I am worried that I lack creative ideas. It is your article that makes me full of hope. Thank you. But, I have a question, can you help me?
It is truly a nice and useful piece of information.
I’m glad that you just shared this useful information with
us. Please stay us up to date like this. Thank you for sharing.
Your article helped me a lot, is there any more related content? Thanks!
Thanks for sharing. I read many of your blog posts, cool, your blog is very good. <a href="https://www.binance.com/register?ref=IXBIAFVY" rel="nofollow ugc">https://www.binance.com/register?ref=IXBIAFVY</a>