
Hit enter to search or ESC to close


Lightroom is a powerful tool for portrait photo editing services, offering a wide range of features and capabilities that allow photographers to bring out the best in their subjects. However, mastering the art of portrait editing in Lightroom can be daunting, especially for those new to the field.
Fear not! Today we're going to be diving into Lightroom and we are going to be running you through my top five portrait photo editing tips for anyone out there shooting and editing portraits, so you can edit them like a professional.
Tip 1: Optimize Exposure and Contrast for Impactful Portraits
One of the fundamental steps in portrait photo editing services is ensuring proper exposure and contrast. This is the foundation upon which all other editing adjustments will be built, so it's crucial to get it right.
Begin by assessing the overall exposure of the image. Ideally, the subject's face should be well-illuminated, with a balanced distribution of highlights and shadows. Use the Exposure slider in Lightroom to adjust the overall brightness of the image, being mindful not to overexpose or underexpose critical areas.
Next, turn your attention to the Contrast slider. Increasing the contrast can add depth and dimension to the portrait, making the subject's features more defined and striking. However, be careful not to push the contrast too far, as this can result in a harsh or unnatural appearance. Aim for a balanced, harmonious contrast that brings out the best in your subject's features.
Tip 2: Enhance Skin Tones with the Calibration Panel
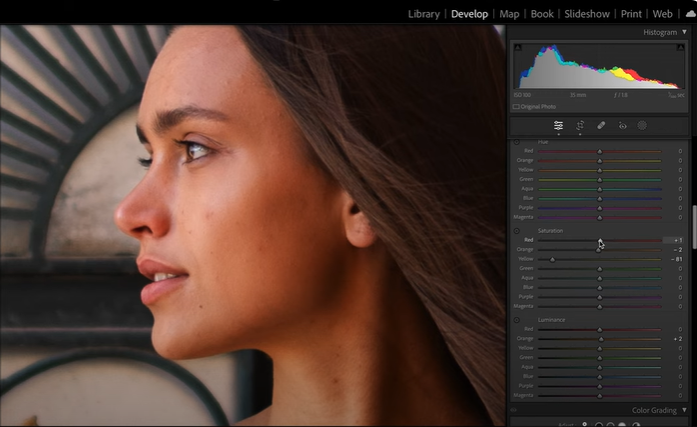
Achieving natural, accurate skin tones is a hallmark of professional-grade portrait editing. The Calibration panel in Lightroom offers a powerful set of tools for fine-tuning and enhancing skin tones, helping you create a cohesive, visually appealing look.
Start by adjusting the Red, Green, and Blue primary and secondary sliders in the Calibration panel. Small adjustments to these settings can have a significant impact on the overall warmth, coolness, and balance of the skin tones. Experiment with these controls until you find the perfect match for your subject's complexion.
Additionally, consider using the Hue, Saturation, and Luminance (HSL) panel to further refine the skin tones. This allows you to target specific color ranges and make precise adjustments to the saturation and brightness of the skin, ensuring a natural, even appearance.
Tip 3: Utilize the Frequency Separation Technique for Flawless Skin
The frequency separation technique is a widely adopted method in portrait photo editing, allowing you to smooth and refine skin texture without losing important details or creating an overly airbrushed look.
This technique involves separating the high and low frequencies in the image, enabling you to address specific skin issues (such as blemishes, wrinkles, or uneven texture) while preserving the natural quality of the subject's complexion.

To apply frequency separation in Lightroom, start by duplicating the original layer. Then, use the Gaussian Blur filter to create a low-frequency layer, which contains the overall skin tone and texture. Next, create a high-frequency layer by subtracting the low-frequency layer from the original layer. This high-frequency layer will contain the fine details and imperfections in the skin.
From here, you can use the Adjustment Brush tool to selectively smooth and refine the high-frequency layer, addressing specific skin concerns without altering the natural appearance of the subject's complexion.
Tip 4: Selectively Dodge and Burn to Sculpt Facial Features
Dodging and burning is a classic editing technique that can be incredibly powerful in portrait photo editing. By selectively lightening (dodging) or darkening (burning) specific areas of the face, you can sculpt and accentuate your subject's features, creating a more defined and visually striking look.
In Lightroom, use the Adjustment Brush tool to target areas such as the eyes, cheekbones, jawline, and nose. Lighten these key features to make them stand out, and darken the surrounding areas to create depth and dimension.
Tip 5: Add Depth and Drama with Vignetting and Graduated Filters
To elevate your portrait photos and create a more professional, polished look, consider incorporating the use of vignetting and graduated filters in your Lightroom editing workflow.
- Vignetting
is a technique that involves darkening the edges of an image, drawing the viewer's attention to the subject at the center. In Lightroom, you can apply vignetting using the Post-Crop Vignetting controls, adjusting the Amount, Midpoint, and Feather settings to achieve the desired effect.
- Graduated Filters
On the other hand, graduated filters allow you to apply subtle, linear adjustments to specific areas of the image. This can be particularly useful for portrait photography, as you can use graduated filters to darken the background, lighten the subject's face, or create a more balanced and visually appealing composition.
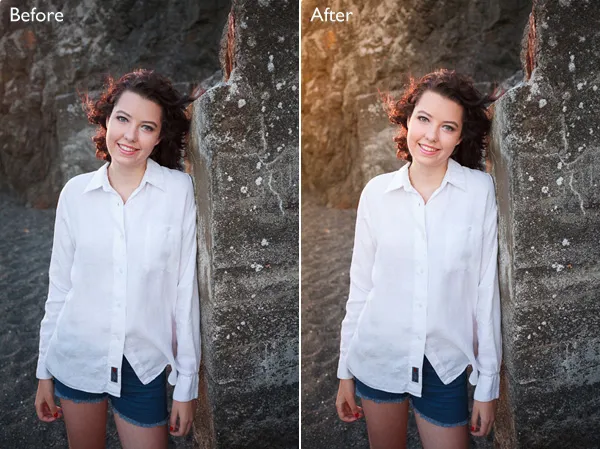
Experiment with different vignetting and graduated filter settings to find the perfect look for your portrait photos. Remember, the goal is to use these tools judiciously, enhancing the overall impact of the image without drawing too much attention to the editing itself.
Final Thoughts:
By mastering these 5 essential tips for portrait photo editing services in Lightroom, you'll be well on your way to creating visually stunning, professional-quality images that captivate your audience.
Whether you're a seasoned photographer looking to refine your post-processing workflow, or an aspiring creative looking to take your portrait photography to new heights, these Lightroom editing techniques will prove invaluable.
Remember, the key to successful portrait photo editing is a combination of technical skill and artistic vision. Don't be afraid to experiment, try new approaches, and find the editing methods that best complement your unique style and creative vision.