
Hit enter to search or ESC to close
Trending Now

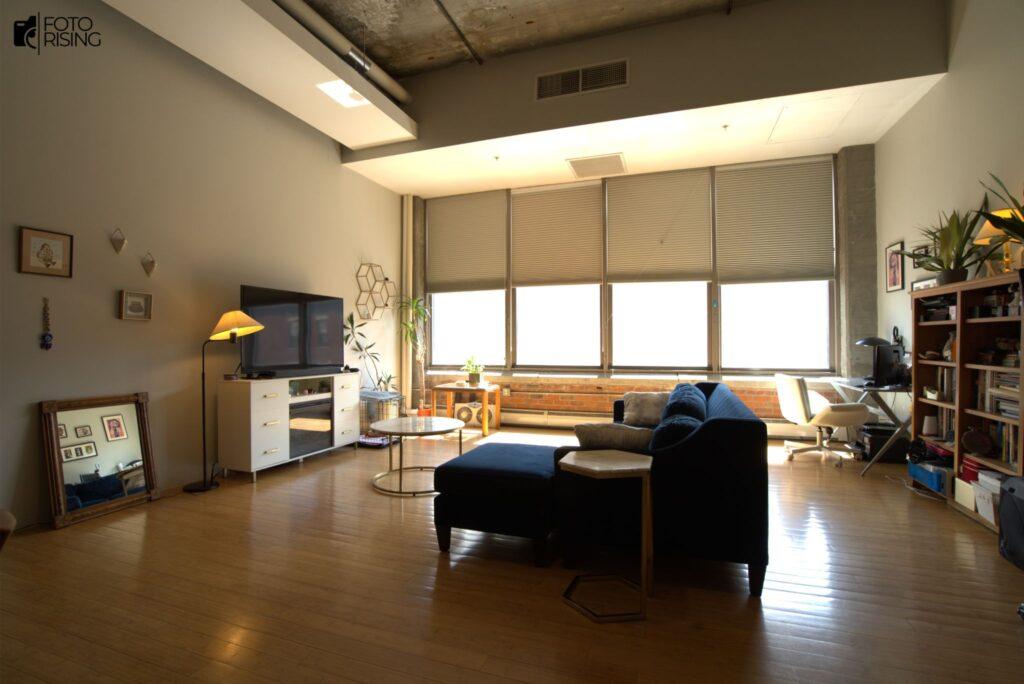
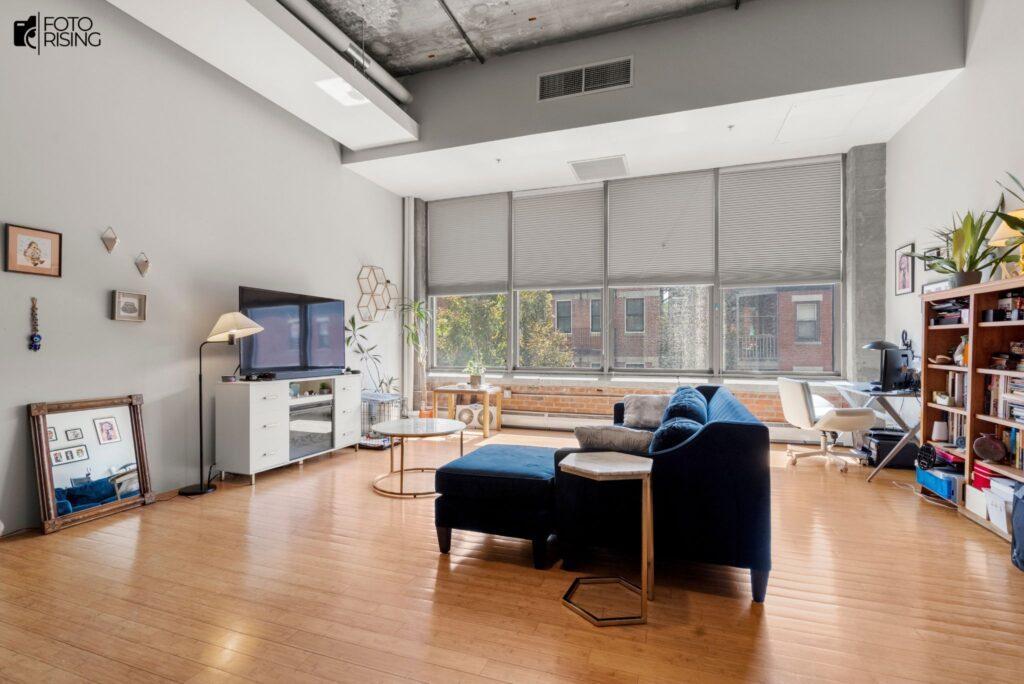
You just shot a gorgeous living room, natural light pouring in everywhere, but when you pull up the photo on your computer, the window is a blank white blob with no view at all. This is a familiar headache for almost every real estate photographer, and window pull editing is the post-processing technique built specifically to fix it. In this article, we'll cover what window pull editing is, why windows blow out so often in real estate photography, and the full step-by-step process for getting a photo that shows both a beautifully lit interior and a crisp view outside.
1. What Is Window Pull Editing?
Window Pull Editing is a post-processing technique that balances the exposure between a room's interior and the scene visible through its windows, so both areas show up clearly in the same photo. Instead of letting the window blow out into a lifeless white patch, this technique "pulls" the correctly exposed details of the outdoor scene into the shot, letting viewers see the backyard, pool, or landscape surrounding the property.
The name "window pull" comes directly from this action: the editor pulls the properly exposed window area from one exposure and blends it into another photo where the interior is exposed correctly. In essence, the technique mimics how the human eye sees a room, our eyes constantly adjust to see detail in both bright and dark areas at once, while a camera sensor has a limited dynamic range and simply can't capture that same range in a single shot.
People often confuse window pull editing with standard HDR blending. The key difference is that window pull usually focuses on the window area specifically, using manual or semi-automatic masking, while HDR blending tends to merge the entire image algorithmically across multiple exposures.
2. Why Do Windows Blow Out in Real Estate Photos?
The root cause is the huge gap in light intensity between the inside and outside of a home. Interior lighting, even with the lights on, is almost always much dimmer than natural daylight outside. When a camera meters the scene and picks its exposure settings, it's forced to choose one of two outcomes:
- Expose correctly for the interior → the window blows out completely
- Expose correctly for the window → the interior goes dark and loses detail
This is exactly why window pull editing has become a standard step in professional real estate photo editing. From a business standpoint, losing detail through the window means losing one of a property's biggest selling points, a backyard, pool, or mountain view is often what makes a buyer click on a listing in the first place. Poor-quality listing photos that skip this detail directly hurt engagement and can slow down how quickly a property sells.
3. The Step-by-Step Window Pull Editing Process
3.1. Preparing Your Shots Before Editing
The quality of your final window pull editing result depends heavily on how well you prepare during the shoot. Key things to keep in mind:
- Camera settings: Shoot in manual or aperture priority mode, with an aperture around f/8–f/11 for sharp focus from front to back and ISO kept between 100 and 400 to minimize noise.
- Gear: a tripod is essentially mandatory, since it keeps your bracketed shots perfectly aligned for blending later; a remote trigger helps avoid camera shake.
- Bracketing: Capture at least 2–3 different exposures of the same frame, one correctly exposed for the interior and one correctly exposed for the window.
- Avoiding glare and reflections: Don't shoot straight-on into the glass, and consider a polarizing filter to cut down on reflections.
3.2. Editing in Photoshop
Once you have your bracketed shots, the manual window pull editing workflow typically looks like this:
- Pick your base image, the exposure where the interior looks best.
- Bring the correctly exposed window shot in as a layer on top.
- Create a layer mask (using a manual brush or a luminosity mask) to reveal only the window area from the top layer.
- Match white balance and color tone between the two layers so there's no mismatch between the inside and outside of the frame.
- Feather and clean up the mask edges, checking the window frame closely so the blend doesn't look obvious.
3.3. A Companion Technique: Flambient
Flambient combines a flash-lit exposure with an ambient-light exposure. The flash shot keeps the interior bright and clean without pushing the ISO too high, while the ambient shot preserves the natural look of the window view. Because they complement each other so well, flambient is frequently paired with window pull editing to produce the most realistic result. One thing to watch for: flash can create glare on the window glass, so it helps to try a different flash angle while shooting, then clean up any leftover reflections in post.
4. Tools for Window Pull Editing
There are three common ways to approach window pull editing, each suited to a different need:
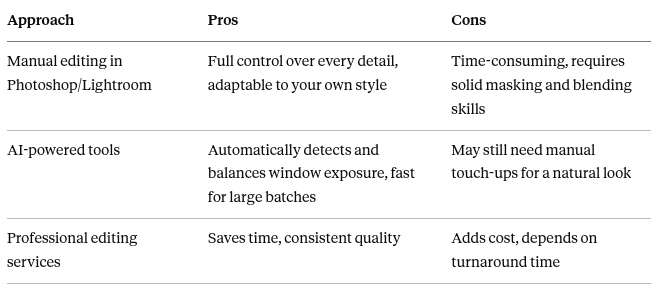
A growing number of real estate photography studios are now leaning on AI-powered window pull editing tools, especially when paired with bracketed or HDR-merged shots, cutting down significantly on the time it takes compared to manual masking.
5. Common Window Pull Editing Mistakes (and How to Fix Them)
- Visible mask edges: feather the mask gently and always zoom to 100% to check the window frame before exporting.
- Color mismatch between the inside and outside of the window: use the eyedropper tool to compare colors and adjust curves or color balance on each layer separately before blending.
- Flash reflections on the glass: change your flash angle while shooting; clean up any remaining glare with the clone stamp or patch tool afterward.
- Halo effect around the window frame: avoid over-feathering the mask and keep a close eye on contrast at the blend edge.
6. DIY vs. Hiring a Service: Which One Should You Choose?
If you're only editing a handful of photos and want full creative control over the style, doing window pull editing yourself in Photoshop is a solid choice, as long as you have the time and skill. On the other hand, if you're working through a heavy volume, say, multiple properties or listings every week, using an AI tool or hiring a professional editing service will save you significant time, letting you spend more hours shooting instead of editing.
7. Final Thoughts
Window Pull Editing solves one of the most persistent problems in real estate photography: keeping both a well-lit interior and an inviting view through the window in a single, believable shot. Whether you choose to master the manual Photoshop workflow or lean on an AI tool to save time, getting comfortable with this technique will noticeably improve the quality of your listing photos and make every property you shoot more appealing. Try it out on a simple bracketed shot today and see the difference for yourself.
2 responses to “What Is Window Pull Editing? How to Fix Blown-Out Windows in Real Estate Photos”
[…] What Is Window Pull Editing? How to Fix Blown-Out Windows in Real Estate Photos […]
[…] more:Day-to-Dusk Real Estate Editing vs. Twilight Photography ExplainedWhat Is Window Pull Editing? How to Fix Blown-Out Windows in Real Estate PhotosProfessional Real Estate Editing in the AI […]